

4 hours ago
Hi all, long time no post 
Brian managed to track down some NASCAR Truck kits from Slot Wagen and I have been tasked with the building and painting of these.
He thought a little mini build log/review would be nice, so here we go!
Here are the component as supplied in the "full kit" (other options are available).
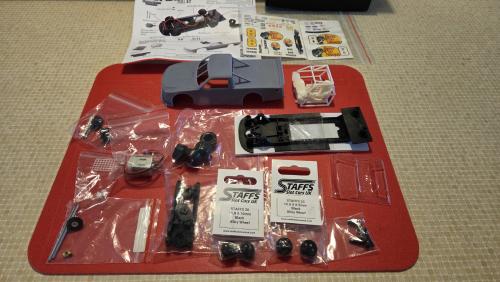
Basically everything required to build a working slot car, or nearly as we shall see in a bit.
I have run through a dry run of the build and already have discovered its a little more work than just assembling the kit.
As you can see we have a podded chassis, giving us an inline configuration.
Unfortunately the pods are not quite the same as Slot.It pods, and TBH if you are not designing a pod with any Special purposes, why would you not make the mounting points the same as one of the leaders in the field ? Maybe its just the way I think.
Like wise these are inline only, I feel with a little more thought they could have been made to accommodate any of the common trio of motor mount configurations. Again just my opinion but that's what I would have done (I may even be tempted to design and print my own chassis for these, but I digress
A view showing the slight difference in mounting holes spacing between these and Slot.It pods.
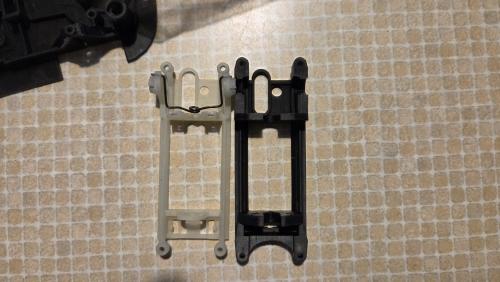
Then there is another "quirk". The kit is supplied with a "Mabuchi" style motor, yet the pod supplied is almost designed for a long can NC5 style motor.
I say almost because it would have fitted had they thought about the wiring tabs, you could bend the tabs upright but its not something I would be happy doing. Again it seem odd that you would nearly have the option to use a long can, but for the lack of foresight to tweak the design to allow this. You could makes some cut outs yourself to allow this, but I won't go that route as I am aiming to build the kit as supplied.
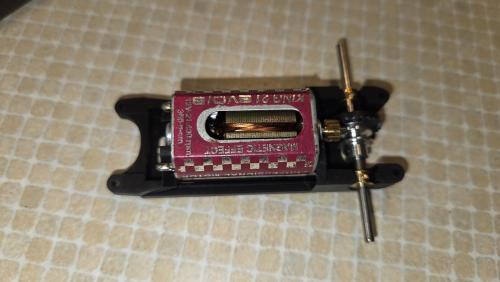
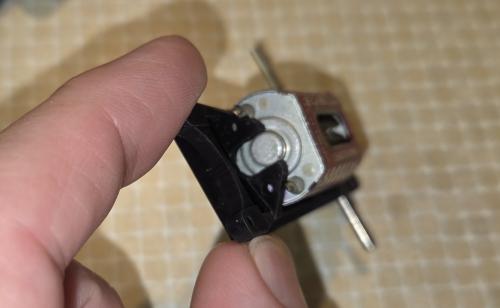
Instead, what we have is some adaptors to make the supplied motor fit. I did need to open out the holes to get the motor shaft through.
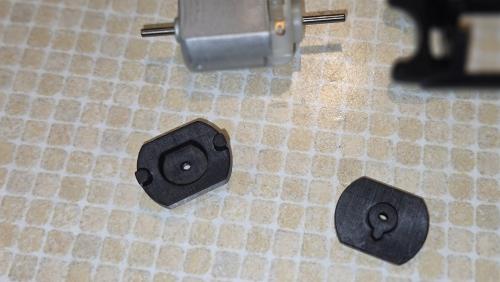
what a I failed to do is photograph the other side of these adaptors, but you can see the recess one one where a little locating peg is on the other side, both have this peg on the other side. one side of the pod has a slot to accommodate this, meaning the motor can only correctly sit one way.
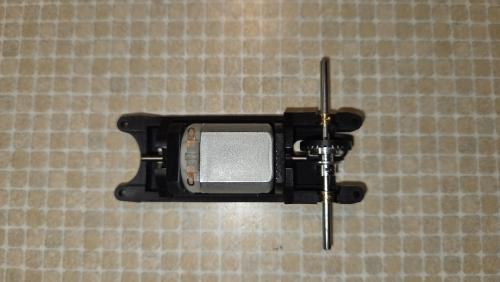
If it had been reversed, the longer motor shaft on the plastic end would have acted as a self centre for the rear axle, but this way does not. This means we have to buy/make spacers or stoppers to keep the rear axle centred. Some may say this is how it should be rather than relying on the motor shaft, but that's another debate.
It does mean we can't complete the kit as supplied. We could grind off the peg to reverse the motor, and then drill holes so we can secure the motor from twisting under load, but for the purposes of this build I will find or make some spacers in due course.
The supplied bearings are a loose fit in the pod, so will require gluing in. When I prepare a slot car, I would do this anyway so I shouldn't grumble.
The front axle holder has supplied grub screws, holes and slots to enable a height adjustable front axle, but again the slots need opening up as they are a bit tight of the supplied axle.
The supplied guides (one 5.8mm deep and one 7.6mm) also require you to open up the chassis hole to ensure free movement. These are supplied with tinned 0.7mm braids (they seem quite thick when you are used to dealing with 0.2-0.4 braids!).
To fit the body to the chassis, you are given some nuts and bolts. The nuts should be fixed in the body with some adhesive, allowing you to insert the bolts through the chassis - if you could ! The problem is the heads of the bolts are slightly to large to go in the chassis recess. There does look to be enough material that I can use a drill to open these out a little, but again, one would expect supplied fittings to go in without needing to alter anything.
Once this has been addressed, the front of the chassis won't seat fully home because there is a recess that is perhaps 0.5mm at most, and a 1.6mm thick chassis. Rather than grind back the 3DP resin body, I will opt to cut off part of the chassis in this area as it is non structural here.
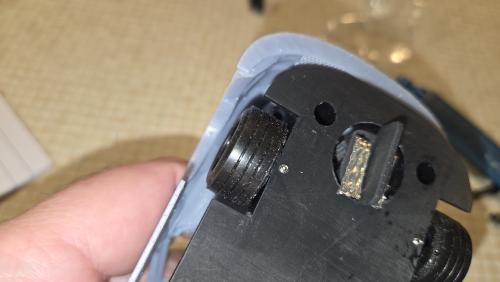
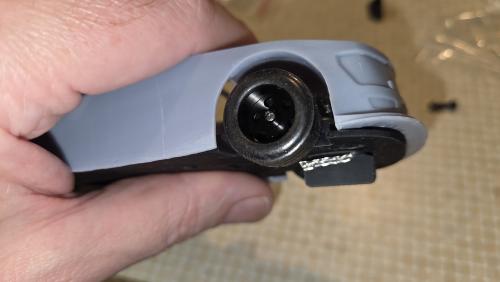
The fitment of the front wheels only just has enough clearance to keep the supplied tyres under the aches with very minimal lateral movement, for any club racing rules regarding keeping the tyres inside the arches, you may need to use narrower tyres or slice the supplied ones down a little. As these are for home use they may be ok, assuming that body float and my preferred lateral play does not cause any issue when ride height is set-up.
Likewise, the rears will probably need a bit of narrowing to sit inside the arches as they do on the real thing.
The full kit supplies some staff "bullet hole" wheels, 15.8 x 10mm rear and 15.8 x 8.5mm front with what looks to be urethane tyres that are approx. 21.3 mm diameter and just over 12mm wide rear and just over 10mm wide fronts once mounted on the wheels.
To recap, some fettling required. Nothing major but I can't help thinking a lot of it could have been resolved before production. Maybe thats just me, but I would expect it should all fit and work straight out of the box, being an "artisan" product is not an excuse in my book.
Likewise a little more thought with the design could have made the product more versatile for no extra cost.
But at the end of the day, at least we have some NASCAR Trucks to race.
There will be further updates once I have built the rolling chassis and am happy with that, and further again down the road when I get to painting.
I will leave it to Brian to furnish you with information of where to buy these kits and anything else he wants to add.
Brian managed to track down some NASCAR Truck kits from Slot Wagen and I have been tasked with the building and painting of these.
He thought a little mini build log/review would be nice, so here we go!
Here are the component as supplied in the "full kit" (other options are available).
Basically everything required to build a working slot car, or nearly as we shall see in a bit.
I have run through a dry run of the build and already have discovered its a little more work than just assembling the kit.
As you can see we have a podded chassis, giving us an inline configuration.
Unfortunately the pods are not quite the same as Slot.It pods, and TBH if you are not designing a pod with any Special purposes, why would you not make the mounting points the same as one of the leaders in the field ? Maybe its just the way I think.
Like wise these are inline only, I feel with a little more thought they could have been made to accommodate any of the common trio of motor mount configurations. Again just my opinion but that's what I would have done (I may even be tempted to design and print my own chassis for these, but I digress
A view showing the slight difference in mounting holes spacing between these and Slot.It pods.
Then there is another "quirk". The kit is supplied with a "Mabuchi" style motor, yet the pod supplied is almost designed for a long can NC5 style motor.
I say almost because it would have fitted had they thought about the wiring tabs, you could bend the tabs upright but its not something I would be happy doing. Again it seem odd that you would nearly have the option to use a long can, but for the lack of foresight to tweak the design to allow this. You could makes some cut outs yourself to allow this, but I won't go that route as I am aiming to build the kit as supplied.
Instead, what we have is some adaptors to make the supplied motor fit. I did need to open out the holes to get the motor shaft through.
what a I failed to do is photograph the other side of these adaptors, but you can see the recess one one where a little locating peg is on the other side, both have this peg on the other side. one side of the pod has a slot to accommodate this, meaning the motor can only correctly sit one way.
If it had been reversed, the longer motor shaft on the plastic end would have acted as a self centre for the rear axle, but this way does not. This means we have to buy/make spacers or stoppers to keep the rear axle centred. Some may say this is how it should be rather than relying on the motor shaft, but that's another debate.
It does mean we can't complete the kit as supplied. We could grind off the peg to reverse the motor, and then drill holes so we can secure the motor from twisting under load, but for the purposes of this build I will find or make some spacers in due course.
The supplied bearings are a loose fit in the pod, so will require gluing in. When I prepare a slot car, I would do this anyway so I shouldn't grumble.
The front axle holder has supplied grub screws, holes and slots to enable a height adjustable front axle, but again the slots need opening up as they are a bit tight of the supplied axle.
The supplied guides (one 5.8mm deep and one 7.6mm) also require you to open up the chassis hole to ensure free movement. These are supplied with tinned 0.7mm braids (they seem quite thick when you are used to dealing with 0.2-0.4 braids!).
To fit the body to the chassis, you are given some nuts and bolts. The nuts should be fixed in the body with some adhesive, allowing you to insert the bolts through the chassis - if you could ! The problem is the heads of the bolts are slightly to large to go in the chassis recess. There does look to be enough material that I can use a drill to open these out a little, but again, one would expect supplied fittings to go in without needing to alter anything.
Once this has been addressed, the front of the chassis won't seat fully home because there is a recess that is perhaps 0.5mm at most, and a 1.6mm thick chassis. Rather than grind back the 3DP resin body, I will opt to cut off part of the chassis in this area as it is non structural here.
The fitment of the front wheels only just has enough clearance to keep the supplied tyres under the aches with very minimal lateral movement, for any club racing rules regarding keeping the tyres inside the arches, you may need to use narrower tyres or slice the supplied ones down a little. As these are for home use they may be ok, assuming that body float and my preferred lateral play does not cause any issue when ride height is set-up.
Likewise, the rears will probably need a bit of narrowing to sit inside the arches as they do on the real thing.
The full kit supplies some staff "bullet hole" wheels, 15.8 x 10mm rear and 15.8 x 8.5mm front with what looks to be urethane tyres that are approx. 21.3 mm diameter and just over 12mm wide rear and just over 10mm wide fronts once mounted on the wheels.
To recap, some fettling required. Nothing major but I can't help thinking a lot of it could have been resolved before production. Maybe thats just me, but I would expect it should all fit and work straight out of the box, being an "artisan" product is not an excuse in my book.
Likewise a little more thought with the design could have made the product more versatile for no extra cost.
But at the end of the day, at least we have some NASCAR Trucks to race.
There will be further updates once I have built the rolling chassis and am happy with that, and further again down the road when I get to painting.
I will leave it to Brian to furnish you with information of where to buy these kits and anything else he wants to add.
