


- Forum posts: 48,459
- Forum threads: 5,012
- Members: 1,694
- Latest member: DutchKing 66
Upcoming Events
WHO Autumn Stages - 28th-Oct-26
WHO Nascar - 4th-Nov-26
NSCC Leatherhead Swapmeet - 8th-Nov-26 ( - {4})
WHO Tin Top Saturday - 14th-Nov-26
WHO Test & Fun Night - 18th-Nov-26
WHO F1 - 2nd-Dec-26
WHO Tin Top Saturday - 12th-Dec-26
Swindon Swapmeet - 10th-Jan-27

The little white DPR plug in Scalextric cars can be a right pig to remove, often resulting in broken fingernails. There is a tool available which works very well and makes the job simples but but there is no reference to it in any Scalextric literature.
Their Hornby locomotives use exactly the same plug and the tool, part #X6468, is generally available from model railway shops. LINK
A cheap solution if you are struggling with the little blighters.


Hi all!
I'm an old SF member from 12 odd years ago that recently dug out the scalextric to show my kids some entertainment that doesn't involve a mobile phone, tablet or games console!
Got this rug race track set up in the lounge and the kids are loving it!
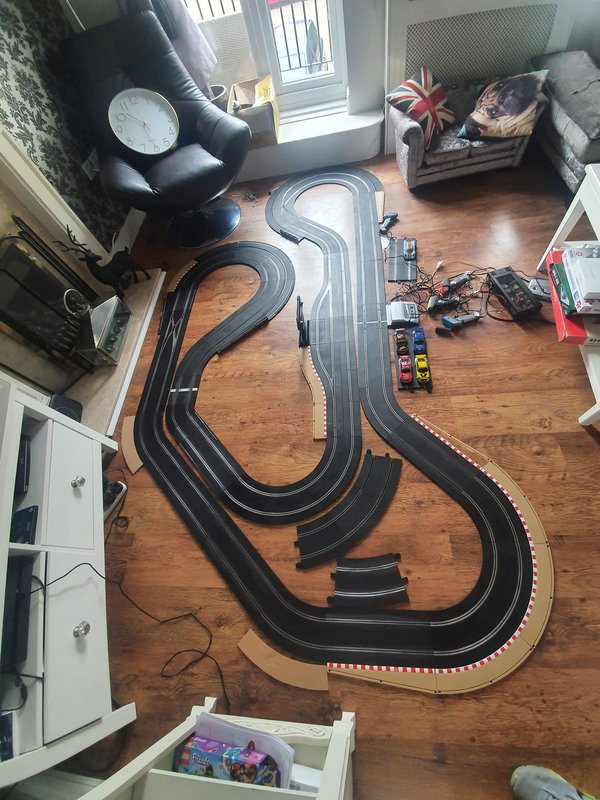
This has inspired me to build a 3 lane wood analogue track that can be dismantled and stored away. I'll set up a new thread in the tracks section for that but here's a quick peek!
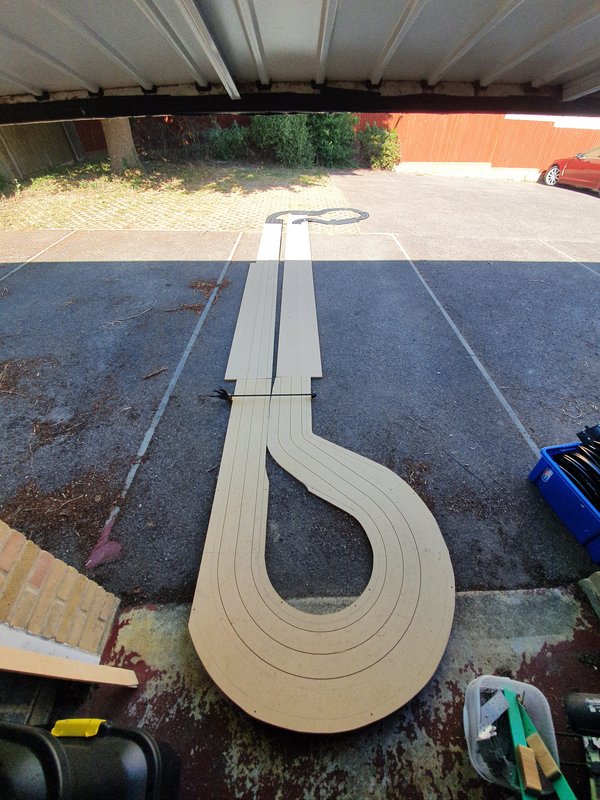
Thanks to Savage (if he's called that on here!) for pointing me over to here, looking forward to looking around and contributing the forum.
Cheers
Stuart

Worldwide shipping.....what's happening, not much?
As the topic suggests, with COVID-19 and grounding of airlines and flights, shipping around the world has been interrupted at best, or stopped at worst.
I can go to my local postal agency and post a package to most countries and earlier in May have done so but I haven't had any updates on parcels I sent being delivered.
I have made a few purchases from other countries UK, China, US, Amazon Australia and USA but nothing has been delivered to my door.
Regarding Amazon, I have busted them in their lies with Amazon stating Stock Is Available for Immediate Dispatch, yet when I enquired I was informed that the stock was in-fact on the ship still floating across the oceans somewhere and Not In Stock at all, I've made a claim against Amazon for shipping costs due to their false statements regarding availability, I've even been updated as to their being an issue on Amazon's end where the order was not processed (it has moved through processing as of July 5) though payment had been taken.
I realise the virus lockdowns and limited international flying is the main reason for this. I would be interested to know of anyone else's recent experiences.

Recently I've seen a few posts about Hydra-dipping, since I'd never heard of this reference, I did a little research and discovered some info which I paste here.
What is hydro dipping and how to dip?
Hydro dipping (also known as immersion printing, water transfer printing and hydro imaging ) is a unique process that allows you to apply graphics to almost any three-dimensional object. This process has been used for years in the auto industry along with many other fields. Other items like firearms, helmets, gaming controllers & ATV's are widely decorated with hydro films these days. There are many different materials (substrates) the film can be applied on such as plastic, metal, wood, and more.
Below are the steps in the dipping process and things to know.
Just to be safe. Keep in mind when hydro dipping, that if water would damage the item any other time such as with electronic devices, then you do not want to dip it as the item will be fully submerged under water. In other words, DO NOT dip your Xbox, PlayStation or even your gaming controller. You need to take it apart (this will most likely void any warranties) and only dip the shell without the electronics. This goes with almost any electronic device.
On a side note, if you want a pair of camouflage socks or a lamp shade with dragons on it? Then go for it!!
NOTE: Some suppliers of hydro film will lie and tell you that you have to use their paints and/or activator. This is NOT true and is just a sales gimmick. Though some activators may work better with some types of film, a good and high quality activator will work for most all films such as hydrovator-activator or K2 SuperBrew.
Prep Work:
After you have decided on an item to be dipped and what design you want to use, it is time to prep the item for dipping. Really, the prep process is no different than if you were just going to be painting the item. You still need to sand/scuff up (if needed or required) the item, prime it, apply a base coat and a clear coat to protect it. The only difference is that now you are adding one step after you apply your base coat and before applying your clear coat, and that's the dipping process.
Base Coat:
The base coat is the layer of paint that gives the film something to adhere too and provides the backing colour or secondary colour to the hydro film design. Most films are designed to work with a white or light tan base coat, but many films can be applied over almost any colour. Even a film that is designed for a white base coat can be applied over another colour to completely change the colouring of the design and make it truly unique.
When viewing our in stock designs, you will see the recommended base coat colour in the product details.
NOTE: You do not have to use a gloss or high gloss base coat just because you want the item being dipped to look like glass when your done. In fact, it is your clear coat that will give the finished product the glossy or matte finish you desire.
Film:
Designs are printed using a special kind of ink on a PVA (Polyvinyl Alcohol) film usually with a rotary printer and some small batches on wide format printers using special inks. This film is water soluble and is designed to absorb moisture which allows the film and ink to soften and become more pliable.
Most films are designed to be hydrated on 90°F water for 60 seconds. Some films such as our Metallic and 40 micron films still need 90°F water but require longer to hydrate, about 90-120 seconds.
When laying the film on the water, you need to be sure that you are laying the correct side of the film facing down. The most reliable way (in my opinion) is to wet your finger and thumb and then grab a corner of the film. When you let go of the film, it will stick to either your finger or your thumb. The sticky side goes facing down. The reason it is sticking to your finger/thumb is that side of the film is the side that is designed to pull in the moisture to hydrate the film.
Check for those air bubbles!! After you lay the film on the water, you will need to get close up and look for air bubbles trapped under the film. An air bubble will prevent that spot of the film from hydrating and therefor leave you with a spot of only your base coat after dipping. When you do find an air bubble, gently blow on it to make it move off to the side and out from underneath the film. Some air bubbles get stubborn and you may need to gently poke/press on it to get it to move.
For smaller or more flat items that are being dipped, such as a light switch covers, you can tape off the border of the film to lay on the water and hydrate. Cut a few relief cuts in the tape before laying on water.
We do recommend however using tanks that allow for barriers rather than masking off borders. This allows the film to naturally expand/contract as needed when hydrating and dipping. If you do not have a high dollar professional dipping tank, don't worry. Before you go to dip, get two pieces of masking tape ready. One that is about 4 inches wider (left to right sides) than the tank and one about 4 inches longer then the depth (front to back) of the tank. After you lay the film on the water, make sure the film is in a corner of your tank and lay these on the water about a quarter inch away from the film and use the extra couple inches to secure them to the sides of your tank. The two pieces of tape will over lap each other and float on the water. By doing so, you will be creating the other two walls (barriers) for the film and it will prevent the film from expanding to far out and acting the same way the barriers on professional grade tanks do.
Activator:
Activator is a chemical that is used in the dipping process that makes it all possible. This chemical is applied to the film after the film has finished hydrating. When the activator is applied, it makes the film dissolve and liquefies the ink.
When dipping with metallic films, you will need to apply a quick and light spray over the film as soon as you lay it on the water and again after it is done hydrating.
Under and over activating are two of the leading causes in problems with hydro dipping. You are not applying a layer of paint, you just need enough activator (with a fine mist, fan pattern spray) to cover the film lightly.
Not all activators are the same. Make sure you are using a good, quality brand activator. We recommend hydrovator-activator with all out films.
Dipping:
After the film has hydrated and the activator has been applied, the item that is having the graphics applied on is slowly lowered (dipped) into the film. As the item is being lowered into the water that has the now liquefied film on top, the surface tension of the water presses the film/design to all angles and surfaces of the item being dipped. This allows the design to be applied on curves and different angles. This film adheres to the surface of the base coat as a result of a chemical reaction between the activator and base coat. The activator softens the outer layer of the base coat which allows the design to bond with the base coat on the item rather than just being another layer over the base coat.
Rinsing:
After your are done dipping, you will notice that the dipped item has a slimy residue all over it now. This residue needs to be rinsed off. People do this in many different ways, using shower heads, garden hoses and even the kitchen sink (again, not recommended as the activator has a strong odour) for the rinsing process. When rinsing, you can help speed things up by gently rubbing on the item while rinsing to help loosen the residue. Don't rub to hard though or you will rub the design back off. You will know when you are done rinsing as the item will start to have a dry feel to it and all the slimy residue will be gone.
Clear Coat:
This is the final process and probably one of the most important steps in the process. The clear coat is what protects the dipped design and gives it the glossy or matte finish you want.
Durability:
Hydro dipping is as durable as the paints and clears you use. If you use an automotive grade paint, then your graphics will be as long lasting and beautiful as the paint on a new car. Different paints are used for different applications, such as auto grade paint (for rims and auto parts) or Cerakote (for firearms and bows). You need to choose the right paint for your project.

[color=rgba(0, 0, 0, 0.87)]Please join me as I discuss the inspiration and body shell options before the work for a new project begins![/color]
[color=rgba(0, 0, 0, 0.87)][/color]
[color=rgba(0, 0, 0, 0.87)]Any and all comments are more than welcomed![/color]
[color=rgba(0, 0, 0, 0.87)]Thanks[/color]
[color=rgba(0, 0, 0, 0.87)] [/color]
[color=rgba(0, 0, 0, 0.87)]John[/color]

Well,
I'm sure all of the grumps are rolling their eyes for my use of "So and Well"
It's looking good Jason , hope my irreverent nonsense will fit in here. Good to see so many familiar "handles" posting in the forum.
I'm really missing my Slot Rallying, both local and the WRP. I've done a bit of work on my tracks during lock down, but ran out of materials. Hopefully they'll be a bit more available now and I can get finished. Unfortunately SWMBO has been cracking the whip and I've been tackling DIY projects around the house, and we've been walking and cycling together quite a bit.
See you around
Simon
I love seafood, particularly shellfish and crustaceans, I can eat mussels till they come out of my ears. Crab and lobster come very high on the list as well but I am puzzled by the huge price difference between these two. They are both abundant in my home county of Norfolk, the inshore fishermen catch roughly equal amounts of each and a Cromer crab is one of the best you will find anywhere in the world. However, a dressed crab costs under £5 while a decent sized lobster is in the region of £20. Granted a lobster is heavier but most of it is shell and the amount of meat is not much more than a reasonable sized crab. They are a nice occasional treat but do not taste £15 better so I stick to crab most of the time. For some reason lobsters have acquired a 'luxury' tag that implies their taste is so superior it justifies a massive price hike out of all proportion to their true worth.
What on earth has this got to do with slot cars you ask? Well, I have been musing about the different makes and have come to the conclusion that there is a crab/lobster syndrome at work here with some makes, particularly NSR and Thunderslot, carrying an unnecessarily high price tag due to their perceived superiority.
Let's take a look at three of the different categories of manufacturer and their average price points:
1) Mainstream manufacturers such as Scalextric, Carrera and SCX. These are essentially toys, built to a price and designed for a mass market. Performance is just about acceptable for that market but components are generally of a fairly low grade - cheap motors, plastic gears etc and fairly rubbish tyres. They mostly rely on strong magnets to hide any design and production deficiencies.
Price range £36 - £41 for standard issues.
2) Enthusiast orientated manufacturers such as Slot.It. They produce significantly superior products, designed and built to be raced properly with or without magnets. Quality metal components instead of plastic, better motors and a wide range of tune up spares. Generally good performance straight out of the box without sacrificing too much scale accuracy.
Price range £50/£55 for standard issues.
3) Pure racing manufacturers such as NSR and Thunderslot. Cars built for speed alone, mainly achieved by taking some liberties with scale accuracy, producing cars that are lower and with a wider track than they should be. Very lightweight and somewhat delicate bodies also help their performance.
Price Range £65/£75 for standard issues.
Now I own examples of all three types and it is obvious why Slot.It cars are dearer than Scalextric. Their build quality and components are much superior and it shows on the track with better handling and significantly faster lap times. I am not so sure about NSR and Thunderslot though. Yes, they are generally faster than Slot.It but not by a huge amount and their component parts are certainly not of any higher quality so why are they so much more expensive?
Personally I don't consider a mere tenth or two off my lap times are worth a price premium of £10/£20 but what do the rest of you think? Are NSR and Thunderslot overpriced lobsters or genuine luxury items worth every penny?
Hi everyone.
Just a few lines to introduce myself to this new (to me) Forum.
I've been racing slot cars almost continuously for 62 years. The only gap was when I was busy helping to build the Connew F.1 car in 1971-72.
Most of my racing was done on my own, having developed a method of running slot races with just myself.
Having returned from a period living in Malta, I joined the Southend Slot Car Club, where I've been racing for six years now.
Having a basic knowledge of website writing, I gained the job of producing the club website, which you can check out here: http://www.southendslotclub.co.uk/
Good news at last, MSV is reopening all its five tracks to spectators from July 11th. LINK Lots of virus related restrictions but the sound of racing motors will reverberate round Brands, Donington Park, Oulton Park, Cadwell Park and Snetterton once again. 

This is the latest very limited edition car being made by MMK. SHould you want one, at 180 euro's, you can contact Victor di Natale on FB.
The 1933 24 hours of Le Man was the 11th Grand Prix of Endurance. It took place at the Circuit de la Sarthe (Le Mans ) on 17 and 18 June 1933. Up against five strong privateer entries from Alfa Romeo, the opposition looked fairly weak, mostly being of 1920s vintage. There was a strong British contingent in the smaller classes. The big drawcard was the presence of top European drivers Louis Chiron and Tazio Nuvolari. The current European champion was paired with one of the previous year's winners,Raymond Sommer[url=https://en.wikipedia.org/wiki/Raymond_Sommer][/url]
From the start, the Italian cars set a strong pace. Sommer broke the track-record several times building a two-minute lead over the Alfas of Chiron,Lewis, Chinetti and Moll He had lapped the rest of the field by the end of the second hour. Chiron was delayed by an intransigent starter unit, but his Co-driver Cortese drove hard to bring the car back up to second going into the night. Most of the other large-engine contenders had fallen away, allowing Odette Siko in a 1.8-litre supercharged Alfa Romeo to move up to fifth. The British teams of Aston Martin, Riley and MG filled out the back end of the top-10.
Hard work by Nuvolari, who was fresh after avoiding driving during the night, had got him back in front by 9am. Soon after, Cortese crashed when a front wheel bearing collapsed. With the closest opposition gone, what could have been a simple run to the finish was anything but. When Sommer pitted the car at midday, their lead was again wiped with repairs to the radiator, brakes and worsening fuel-leak. Mechanics used chewing-gum to plug the crack. Nuvolari would then overtake the smooth-running Chinetti/Gunzberg car only to have to stop to check the fuel-tank and lose the lead again. By the time of the final stops, with an hour to go, the two cars were less than a minute apart. Going onto the last lap, the superior speed of Nuvolari's car allowed him to pass on the back straight, only to lose it again under braking at the Mulsanne corner. Then Chinetti missed a gear at Arnage and Nuvolari was through again. When Chinetti was baulked by slow traffic coming out of White House it gave Nuvolari the clear run to the flag, to win by just 400 metres.
Winning car of Nuvolari and Sommer.
The margin of victory for this race was estimated at being 9.5 seconds difference and remains one of the narrowest racing finishes at Le Mans – excluding the formation finishes of later years. Third, eight laps back, was the British-entered Alfa Romeo of Lewis/Rose-Richards. Fourth, after a very reliable run was the small 1.1-litre Riley of Peacock/van der Becke. Their excellent effort against the larger competition also gave them a handsome margin in winning the lucrative Index of Performance prize.
An expensive but superb very limited edition model.